
Date: Wednesday 15th May 2019
Company: Just myself
Distance: 21.9km, Ascent: 1340m
Time: 7Hrs 30Mins
After work on Tuesday, I drove to Bridge of Orchy to catch-up with a friend who is currently walking the West Highland Way. As the forecast for the following day was fantastic, it was of course also my intention to ascend some nearby hills. I opted for an ascent of Stob a' Choire Odhair and Stob Ghabhar and all going well the two Munro Tops. I last ascended these Munros in 2004 when I undertook a traverse from Inveroran to the Glencoe Ski Centre taking in all four Black Mount Munros.
As the temperature was forecast to be 24C, I wanted up and away early to avoid the worst of the heat and sun. I therefore set my alarm for 5.30 but awoke early so was walking by 5.07.
Click here to see a map of the route undertaken
It was nice to witness the sunrise on setting off from the Victoria Bridge car park and even better to also see a number of young stags.
Sunrise at Victoria Bridge:

Beyond Victoria Bridge, I followed the track towards the Clashgour Hut, a track I had last walked just a couple of years previous to ascend Beinn Suidhe.
Looking towards Stob a' Choire Odhair:

It didn't take long to reach the Clashgour Hut, which is basically a tin shed now used by the Glasgow University Mountaineering Club. I believe it was formerly a school.
Glasgow University Mountaineering club hut:

Immediately beyond the hut, I took the path leading towards the hills. This track is often wet underfoot however owing to the recent spell of dry weather, it was not wet. As I approached the base of Stob Ghabhar and Stob a' Choire Odhair, I could see the Aonach Eagach ridge. This Aonach Eagach ridge is much easier and less-exposed than the Glencoe ridge of the same name.
Looking towards the Aonach Eagach ridge on Stob Ghabhar:

On reaching the start of the SSW ridge of Stob a' Choire Odhair, I followed the track uphill and was soon on the useful zig-zags which make the ascent somewhat easier than that of a direct ascent.
Zig-zag ascent of Stob a' Choire Odhair's SSW ridge:

It was such a beautiful clear morning I could see hills for miles around. Looking back, Ben Lui and the Cruachan range hills were very prominent.
Looking back during ascent of Stob a' Choire Odhair:

Before long, I was out of the shade and into the sun. I therefore stopped to apply sunscreen and put on my sunglasses.
Looking across to Stob Ghabhar:

As I gained more height, the views back to the hills of the Loch Lomond and Trossachs National Park were great.
Beautiful day:

I reached the summit of Stob a' Choire Odhair at 7.15. Had I been walking at Naismith's rule speed, according to the SMC book I should have reached the summit at 7.47. I knew I had been walking at a fairly good pace.
The views from the summit were fantastic. I spent around ten minutes at the summit savouring the views and taking photographs. I also had my first drink of the day.
It was nice to see a wee Saltire in the sky too
At the summit of Stob a' Choire Odhair:

From the summit of Stob a' Choire Odhair, Stob Ghabhar looked a good bit away with a substantial drop in between. I set off from Stob a' Choire Odhair for what is the most technical part of this route.
At the summit of Stob a' Choire Odhair:

The descent from Stob a' Choire Odhair to the col is straight-forward.
Descent to col between Stob a' Choire Odhair and Stob Ghabhar:

Beyond the col, after an initial section of easy ascent, I ascended the steep spur which leads onto the Aonach Eagach ridge. This spur is dangerous in that it is very steep with lots of loose scree. Take care if ascending this way.
Onto the loose spur leading up to the Aonach Eagach ridge:

While ascending the spur, I stopped to take a photo looking back to Stob a' Choire Odhair. These are fantastic hills.
Looking back to Stob a' Choire Odhair:

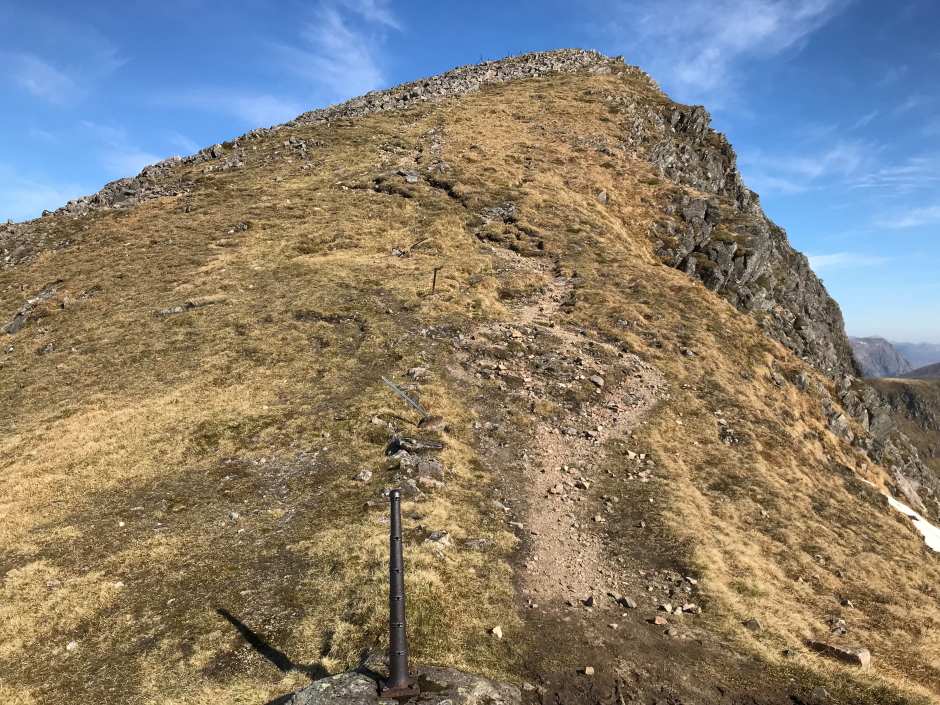
It was a relief to reach the top of the spur and reach the wide Aonach Eagach ridge.
Onto the Aonach Eagach ridge:

This Aonach Eagach ridge is a straight-forward walk with the exception of one fairly short narrow section where you have to take a bit more care. I managed the narrow section without putting hand to rock so any scrambling is avoidable.
Narrow section ahead:

Narrow section behind:

Beyond the narrow section, the ascent to the summit is nice and easy; just follow the fence posts to the summit.
Looking towards the summit of Stob Ghabhar:

Final ascent to the summit of Stob Ghabhar:
The views from the summit were again fantastic. I reached the summit just before 09.15, so I had slowed down to less than Naismith's speed during the walk between the summits. I think this was to be expected given the more technical terrain.
From the summit of Stob Ghabhar, I got great views all round including across to the Glen Coe hills, Glen Etive hills, Ben Nevis and the Mamores as well as all the hills towards Crianlarich and beyond.
Ben Nevis can be seen in the distance just left of centre in the next photo.
Stunning views from the summit of Stob Ghabhar:

Looking back to the Aonach Eagach ridge from the summit of Stob Ghabhar:

From the summit, the walk out to the two Munro Tops looked nice and easy. I therefore continued the walk to also ascend Sron a' Ghearrain and Stob a' Bhruaich Leith, two Munro Tops that I had not ascended previously.
Sron a' Ghearrain barely felt like a separate hill as there was so little ascent to reach its summit.
At the summit of Sron a' Ghearrain:

The walk out to Stob a' Bhruaich Leith seemed to take a bit longer but again it was easy, hands-in-pockets walking to get there.
Heading out to Stob a' Bhruaich Leith:

On reaching the summit of Stob a' Bhruaich Leith, I was wondering why I had not had a mobile signal throughout the entire walk. It then clicked that I had switched-off Mobile Data the night previous to save power. Doh! On switching Mobile Data back on, I immediately got a signal and was then able to upload some pics to Twitter.
At the summit of Stob a' Bhruaich Leith:

Having looked at the map briefly the night previous, I knew that I could drop down from the Munro Top and hopefully pick up a track leading down to Clashgour. I therefore decided to give this a go instead of retracing my steps back to the Munro.
I undertook a descending traverse aiming for the start of the path marked on the map. While this was straight-forward in good dry weather, as there were several gullies to cross this descent may be trickier when the burns are in spate. Saying that it should still be possible to descend this way down to the Mam nan Sac col.
I didn't pick up the very start of the track as I had dropped circa 20m too far. I didn't see the point in re-ascending, so just picked-up the track a wee bit further on. The track is fairly good and gentle. I would recommend this as an easy way back down to Clashgour.
Onto the track leading down to Clashgour:

On reaching Clashgour, I stopped for ten minutes to stand in the shade and apply more sunscreen. It was now very hot and I was looking forward to getting back to the van. On reaching the van, it was 36C inside so not particularly pleasant. Thankfully it has air-con, so it was soon down to a reasonable temperature.
These two hills make a fantastic circuit but I would suggest they are not for the very inexperienced especially in poor visibility. Carrying on to also ascend the two Munro Tops extends the walk but provides for an easier route of descent.
An awesome day out